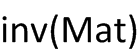
Tuesday, April 24, 2012

Electrical – fluid (hydraulic) analogy

The following table shows some analogy between electrical and fluid systems. It is useful for people who want to understand one of these systems by comparing with another system. Also, it’s pretty useful for hydraulic circuit designers as they may get ideas from existing electronic circuits and apply it to hydraulics.

Electrical
Hydraulic
Electric current intensity (Ampere = Coulomb\sec)
Mass flow rate (kg\sec)
Electric potential difference (voltage difference)
Pressure gradient (difference)
Electric charge quantity
Fluid mass
Flexible wire
Flexible hose
PCB (Printed Circuit Board)
Rigid pipes
Diode
Check valve (one-way valve)
Electric capacitor
Elevated tank or accumulator
Triger diode DIAC
Pressure regulator valve
Battery
Pump
On /off switch
Valve fully-opened/fulley-closed
Electric resistance
Pipe friction, entrance and exit losses, and fittings losses.
Potentiometer (variable resistance)
Proportional valve
Fuse

Step down transformer: Reduces voltage and increases current intensity
Nozzle: Increases velocity and reduces pressure
Step up transformer: Increases voltage and decreases current intensity
Diffuser: Decreases velocity and increases pressure
Inductance: Shows some impedance when electric current changes and has zero impedance when current is fixed
Rotary motor: Shows some impedance when mass flow rate changes (due to rotor inertia).
AC current
Pulsating flow
Dielectric insulator
Seal
Reference Earth (ground)
Reference → Free surface (atmospheric pressure)
Comparator
Differential valve
Logic gate OR
OR (shuttle) valve
Relay
Hydraulic-actuated valve
Optocoupler
Hydraulic coupling
Electric surge
Water hammer
Eddy current
Turbulent flow
KCL
Continuity equation
KVL
Bernoulli equation
Ameter
Flow meter
Voltameter
Pressure gauge
Medium: electric conductor
Medium: fluid
Electric resistivity
Fluid viscosity
Circuit breaker
Isolation valve
Amplifier
Hydraulic intensifier
Bundle cables
Laminar flow element

Point inside convex hull detection

If we want to check if a point lies inside a prescribed convex hull or not, then here you are a method. I don’t know if this method was introduced before or not (but I'm sure in such a high-tech world, it was introduced by someone)

Assumptions:
     
    1. The convex hull is described by the indices of points according to their connectivity order.
     2. If point lies on the edge or coincides with any vertex of the polygon’s vertices, then it is not going to be considered inside the convex hull.

Algorithm:
Create vectors from the point to all the vertices of the convex hull. For all vectors, compute the cross product of the vector with the next vector according to points connectivity. If all cross products have the same sign (positive or negative) then the point is inside, else it’s outside or on edge. One great advantage of this method that its low sensitivity to round off errors and the reduced accumulative errors encountered in other methods. Consider the case of the triangle shown in figure below and see directions of cross products and their signs.


The following table shows all possible cases for the signs of the cross products and what does each case mean


Signs of cross products of successive vectors
Means …
All are positive
Point is inside the convex hull
All are negative
Point is inside the convex hull
Some are positive, some are negative
Point is outside the convex hull
Some are positive, some are zeros
Point is on edge, or outside and collinear with an edge
Some are negative, some are zeros
Point is on edge, or outside and collinear with an edge
All are zeros
Convex hull collapses to a single point


Monday, April 23, 2012

Explicit Delaunay triangulation

Hello guys. In this post I'm not going to discuss in details the Delaunay triangulation, but I want to give a hint about implementing Delaunay method explicitly.

As we know, for a set of points triangulated using Delaunay triangulation, each triangle has no points inside the circumscribed circle of it. So, I tried to implement this principle explicitly by the following method.

For each combination of 3 points compute the circumcenter and radius of the circumcircle and check distances between this circumcenter and all points. If the minimum distance of those distances is larger than the radius, then no points exist inside the circumscribed circle and this triangulation is valid.

Actually, this method is quite stupid, but why? The problem in this method is degeneracies. We have two cases of degeneracies:
1. Three points are on the same line. So, using direct geometry concepts or substitution in equations that compute the coordinates of the circumcenter will return no circumcenter or circumcircle.
2. Certain number of points forms a cyclic polygon. In this case, when checking for 3 points of them we will find other points on the circumcircle and so we have to make a decision (see figure below)
a. First decision: assume points on the circumcenter are inside the circumcenter. As a result, no triangulation will be created.
b. Second decision: assume points on the circumcenter are outside the circumcenter. The result is overlapping triangles. 


So, we should look for another method to compute the Delaunay triangulation like the randomized incremental method introduced by Boywer-Watson, randomized incremental method introduced by Lawson, Voronoi-Delaunay duality, projection method, or edge flipping (optimization).

When you implement any method for triangulation, just check if it's going to work with the degeneracies or not.

Saturday, April 21, 2012

Cont. Basic matrix commands and operations in Scilab

7. Matrix inverse
Basically, in Scilab there are two methods to compute the inverse matrix. The first one is using the command "inv(mat)" and the other method is raising the matrix to power equals (-1). Indeed, we all know that the inverse is computed for a square matrix. So.. consider the following square matrix of size (2 x 2)

the first method is like the following

and the second is 
and both methods will return the same result as shown in below

8. Matrix transpose
Matrix transpose is simply rotating each row 90 degrees in clockwise direction about row pivot in order to be column. The transpose matrix is computed simply by adding the quotation mark (') after the matrix like shown below
Note: this note actually is for people who write codes in word documents. If you are writing Scilab codes in MS Word (or even Word Pad) using any font, you should note that the quotation mark in word file differs from the quotation mark typed in Scilab. The latter will return the matrix transpose, but the quotation mark copied from word document will return an error message "Invalid factor". The following figure shows different quotation marks for different fonts.

The quotation mark used in word documents has ASCII number [226    128   152] while that used in Scilab has ASCII number 39.

Computing the transpose matrix for the matrix used in section 7 will give the following answer
9. Matrix multiplication
We can easily multiply two matrices in Scilab (or Matlab) using the asterisk (*). When multiplying two matrices, number of columns of the first matrix must equal number of rows of the second matrix. Consider the following two matrices
to multiply these two matrices we will use the following command

The answer of matrix multiplication is


10 . Element wise matrix operations
Conceptually, in matrix addition and subtraction we add/subtract each element in the first matrix with/from the corresponding element in the second matrix. So, what should we do if we want to multiply/divide each element in the first matrix by the corresponding one in the second matrix?. The answer is element-wise matrix multiplication or division. All what you have to do is adding dot (.) before the multiplication mark (*) or the division mark (/). See the command below for element-wise matrix multiplication

Consider the following two matrices.


element-wise matrix multiplication will return the following answer
Notes:
  •  Element wise matrix multiplication (and the same for division) is commutative which means
  • Element-wise operations require two matrices of the same size

Wednesday, April 18, 2012

Copy equation from MS Word to Visio

Hello guys. I'm using Microsoft Office 2010 and Visio 2007. In fact when I copy an equation from Microsoft Word to Visio directly it gives me an error like this in the snapshot


Someone is going to whisper and say "Visio has its own equation editor", but I have to say that the equation editor in Visio is difficult to use and sometimes gives strange results.
 
So, I got a method to copy equation from MS Word to MS Visio without errors and preserve the scalable vector state of the equation. Just copy the equation from MS Word to MS Power point and then copy it from MS Power point to Visio and it's done.

I know this is not tricky, but it may helps for others having the same problem

Basic matrix commands and operations in Scilab

1.Matrix creation
To create a matrix in Scilab (or even Matlab) just follow the following syntax


Note: elements in one row can be written separated by commas (,) or spaces (blanks). So, it is more convenient  to use spaces

the previous code will return the following matrix


2. Row vector creation 
To create a row vector of elements starting from value (v1) and ending at value (v2) with a step (dv)


the previous code will return the following

Note: the step may be one of the following cases
  • Positive number. If a positive step is used, the end value should be greater than the start value, otherwise Scilab will return an empty matrix
  • Negative number. If a negative step is used, the end value should be less than the start value, otherwise Scilab will return an empty matrix
  • Zero. If step is zero then Scilab will return an empty matrix
Special case: you can create a row vector with step equals (1) directly without using the step value like the following


and this will return the following row vector


3. Resetting elements in matrix
You will use this in case where you want to change the value of certain element in the matrix to a new value. Consider the following code regarding the matrix we have created in section 1


this command will change the value of the element at (row 2, column 2) to the new value (100).


4. Retrieving (getting) matrix elements

4.1. Get element at (row, column). See the command below (it will return 8)

4.1. Get elements of certain column

and the previous code will return the following column


4.3. Get elements of certain row

 and this will return the following row


4.4. Get all elements of matrix as a column vector
This is useful when  someone needs to convert a two-dimensional matrix to a vector

it will return the following 

When Scilab converts a matrix to a vector (or as I call it "matrix unfolding") it reads each vector in the matrix and add it the new created vector.


The following topics will be covered later

5. Matrix filtering

6. Matrix concatenation

7. Matrix inverse

8. Matrix transpose

9. Matrix multiplication

10. Element-wise matrix operations